

This guide uses Excel for the web, so you can follow it on macOS without
installing the Microsoft Office desktop apps.
What You Need
Before you start, gather:- Node.js 22.12 or higher
- A Microsoft account that can upload custom add-ins in Excel for the web
- An Unsiloed API key from the Unsiloed dashboard
- The sample invoice PDF
What We’ll Build
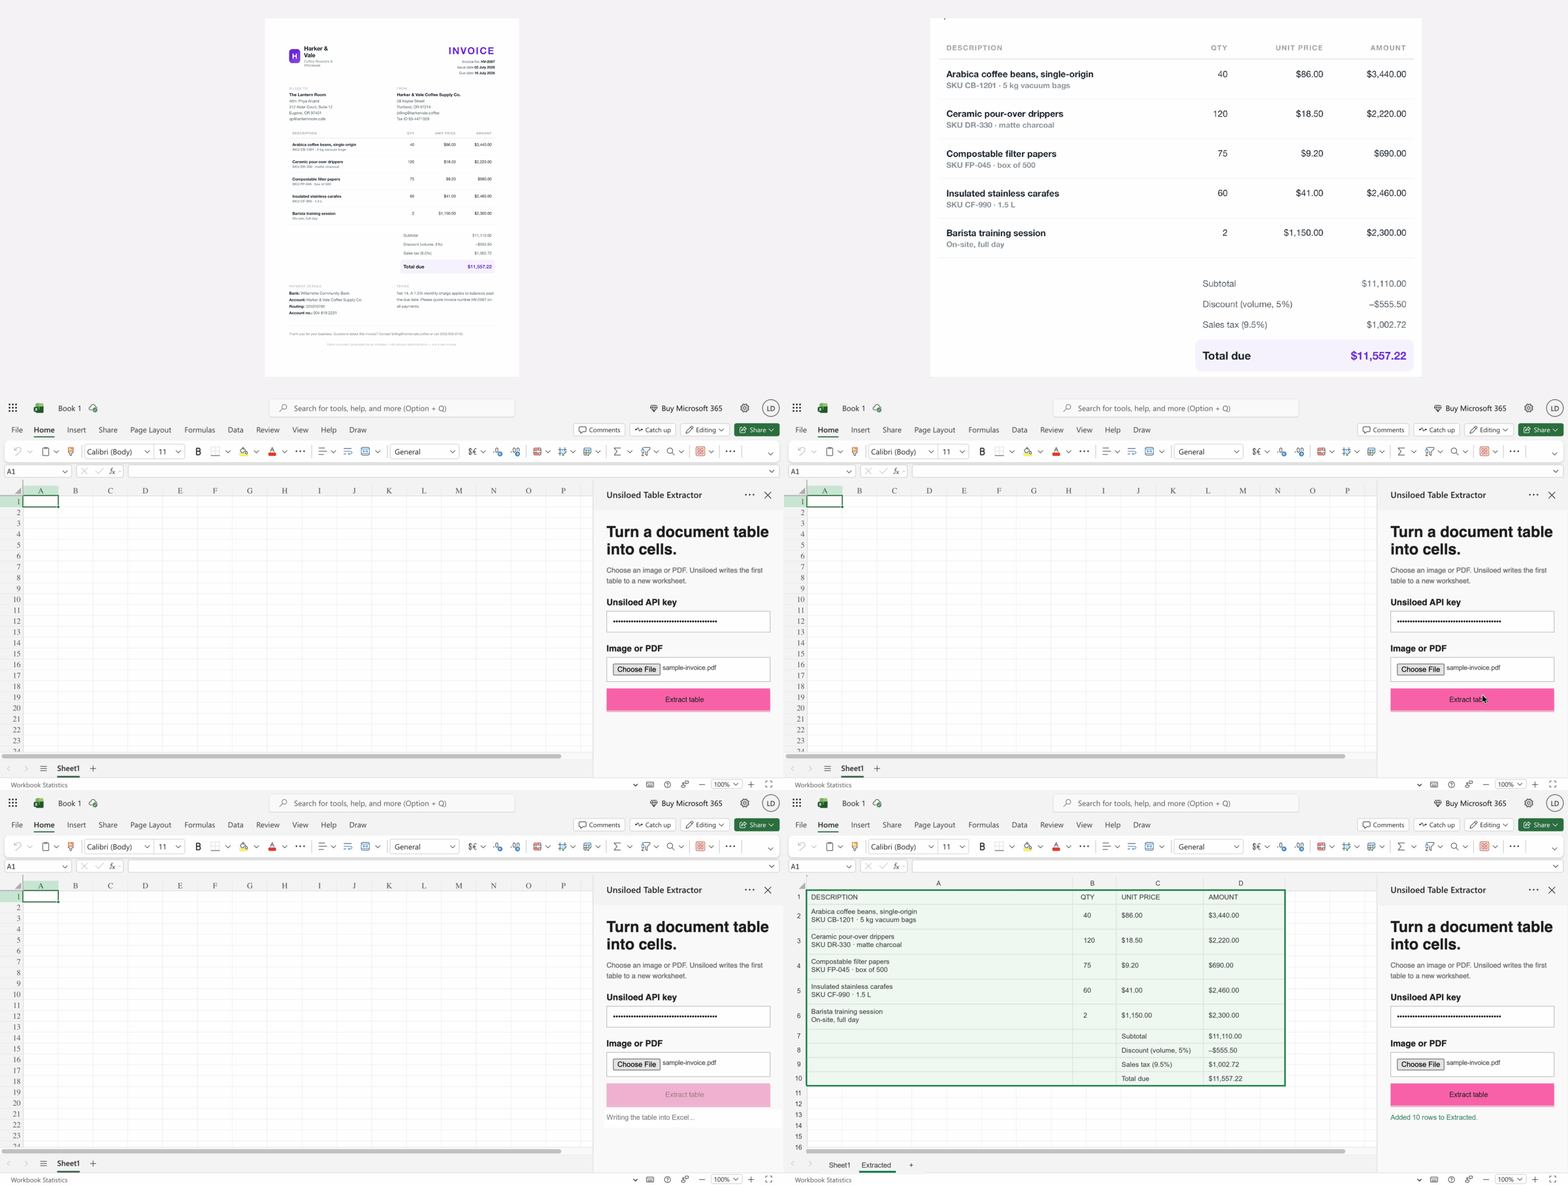
The integration follows four operations:- Office.js confirms that the page is running inside Excel.
- The task pane uploads the selected document to Unsiloed and polls the parse job.
- JavaScript converts the returned table HTML into rows and columns.
- Office.js writes the resulting array to a new worksheet in one operation.
Show the Complete Project
Show the Complete Project
If you want to run the integration without following each explanation, run:Then create the following four files. You can also give this section to a coding
agent and ask it to create the project.Continue at Step 5 to run and load the completed
add-in.
vite.config.mjsvite.config.mjs
index.htmlindex.html
taskpane.jstaskpane.js
manifest.xmlmanifest.xml
Step 1: Create the Project
Open Terminal and run:Step 2: Serve the Add-in over HTTPS
Createvite.config.mjs in the unsiloed-excel-addin directory:
vite.config.mjs
command === "serve" check limits certificate setup to the development
server. A production build doesn’t need the local certificate. strictPort
keeps the URL predictable: if port 3000 is busy, Vite reports the conflict
instead of choosing a different URL that no longer matches the manifest.
Step 3: Build the Task Pane
The task pane separates presentation from behavior. We’ll first assembleindex.html, then build taskpane.js in the same order that data moves
through the integration.
3.1 Create the HTML Page
Createindex.html beside vite.config.mjs:
index.html
Office and Excel objects used later. The final script loads our
code as a JavaScript module after the form exists in the page.
The API key uses a password input, but the browser still holds its value in
memory. This recipe doesn’t put the key in the workbook or browser storage.
3.2 Add Task-Pane Styles
Inside the<head> element of index.html, add this <style> block after
the Office.js script:
index.html
error and success classes let the JavaScript report progress without
using browser alerts.
3.3 Connect the Interface to Excel
Createtaskpane.js beside index.html and add:
taskpane.js
taskpane.js, add the Office readiness and input
listeners:
taskpane.js
Office.onReady runs after Office connects the page to its host. We
enable extraction only when that host is Excel and both form fields have values.
3.4 Coordinate the Extraction
Continuetaskpane.js with the form’s submit handler:
taskpane.js
try block from top to bottom shows the application flow: parse the file,
convert a table to rows, and write those rows to Excel. Each operation lives in
a focused helper function below.
The isBusy guard prevents a second submission while the first job is running.
The finally block clears it after either success or failure, so the reader can
retry without reloading the add-in.
3.5 Send and Poll the Parse Job
Add the function that uploads the file:taskpane.js
FormData object creates the multipart/form-data request expected by
POST /parse. Unsiloed returns a job ID rather than the completed document,
because parsing can take longer than a single HTTP request should remain open.
The final line hands that ID to a separate polling function. Below
parseDocument, add the bounded polling loop:
taskpane.js
GET /parse/{job_id} every 2.5 seconds. It returns the job as
soon as Unsiloed reports Succeeded, surfaces terminal failures immediately,
and passes one abort signal to both the delays and network requests. That signal
ends the entire polling phase after five minutes, including a stalled request.
Continue taskpane.js with the authenticated request and abortable delay
helpers:
taskpane.js
api-key header. Centralizing that header in
apiFetch avoids repeating authentication code in the upload and polling
functions. The helper also turns unsuccessful responses into JavaScript errors,
which the submit handler already knows how to display. The delay helper listens
to the same abort signal as fetch, so the deadline covers both waiting and
network activity.
3.6 Convert Table HTML into a Grid
Add the table conversion functions:taskpane.js
Table, and use the browser’s DOMParser
to read its HTML rows and cells.
The pending map reserves positions covered by rowspan, while the nested
loops expand colspan into empty placeholders. Replacing <br> elements with
newlines preserves multiline descriptions in a single Excel cell. The final
mapping pads every row to the same width.
The safeCellText function prefixes values beginning with =, +, -, or
@ with an apostrophe. Excel then treats untrusted document content as text
instead of a formula.
3.7 Write the Grid and Finish the Interface
Continuetaskpane.js with:
taskpane.js
sheets.load("items/name") requests the
existing worksheet names, and the first context.sync() retrieves them. We
use those names to avoid overwriting a previous extraction.
Setting every destination cell’s number format to @ makes Excel preserve
values such as 00124, $86.00, and 02 July 2026 as extracted text.
Assigning rows to range.values then queues the complete table as a single
write. The second context.sync() sends the write, formatting, activation, and
selection operations to Excel together.
Finish taskpane.js with the interface helpers:
taskpane.js
taskpane.js should match the
complete version at the top of the guide.
Step 4: Describe the Add-in to Excel
Excel doesn’t discover a local web page by itself. The manifest identifies the add-in, declares where it can run, points Excel to the task pane, and requests workbook access.4.1 Add the Identity and Display Details
Createmanifest.xml beside the other project files and add:
manifest.xml
xsi:type="TaskPaneApp". The
URLs are identifiers, not pages the add-in downloads at runtime.
The remaining elements describe the add-in:
Idis a stable UUID that distinguishes this add-in from others. Keep this value for the recipe, or generate a new UUID withuuidgenwhen adapting it.Versiontracks releases of the add-in rather than the Office.js version.ProviderNameandDefaultLocaleidentify the publisher and fallback language.DisplayNameandDescriptionappear in Excel’s add-in interface.IconUrlandSupportUrlprovide the metadata expected by Microsoft’s distribution validator.
IconUrl and SupportUrl are formally optional for local sideloading, but
Microsoft’s distribution validator expects them. They do not affect the
localhost connection.
4.2 Grant Excel Access and Load the Page
Append the rest of the manifest:manifest.xml
Workbook host restricts this add-in to Excel. SourceLocation must
match the HTTPS host and port in vite.config.mjs; it tells Excel which page
to place in the task pane. ReadWriteDocument allows Office.js to create the
worksheet and write the extracted values.
The manifest contains no API credentials. Excel uses it only to register the
add-in and decide what workbook access to grant.
Step 5: Start the Add-in
Fromunsiloed-excel-addin, run:
Step 6: Load the Add-in in Excel
Open Excel for the web, sign in, and create a blank workbook. Microsoft uses different labels for the custom add-in menu across account types. If Manage My Add-ins isn’t present, look for More Settings or Advanced. The Microsoft sideloading guide documents the current routes. If none of these options appears, your organization may have disabled custom add-ins; use a personal account or ask your administrator to enable sideloading.1
Open the Add-ins menu
On the Home tab, click Add-ins (1).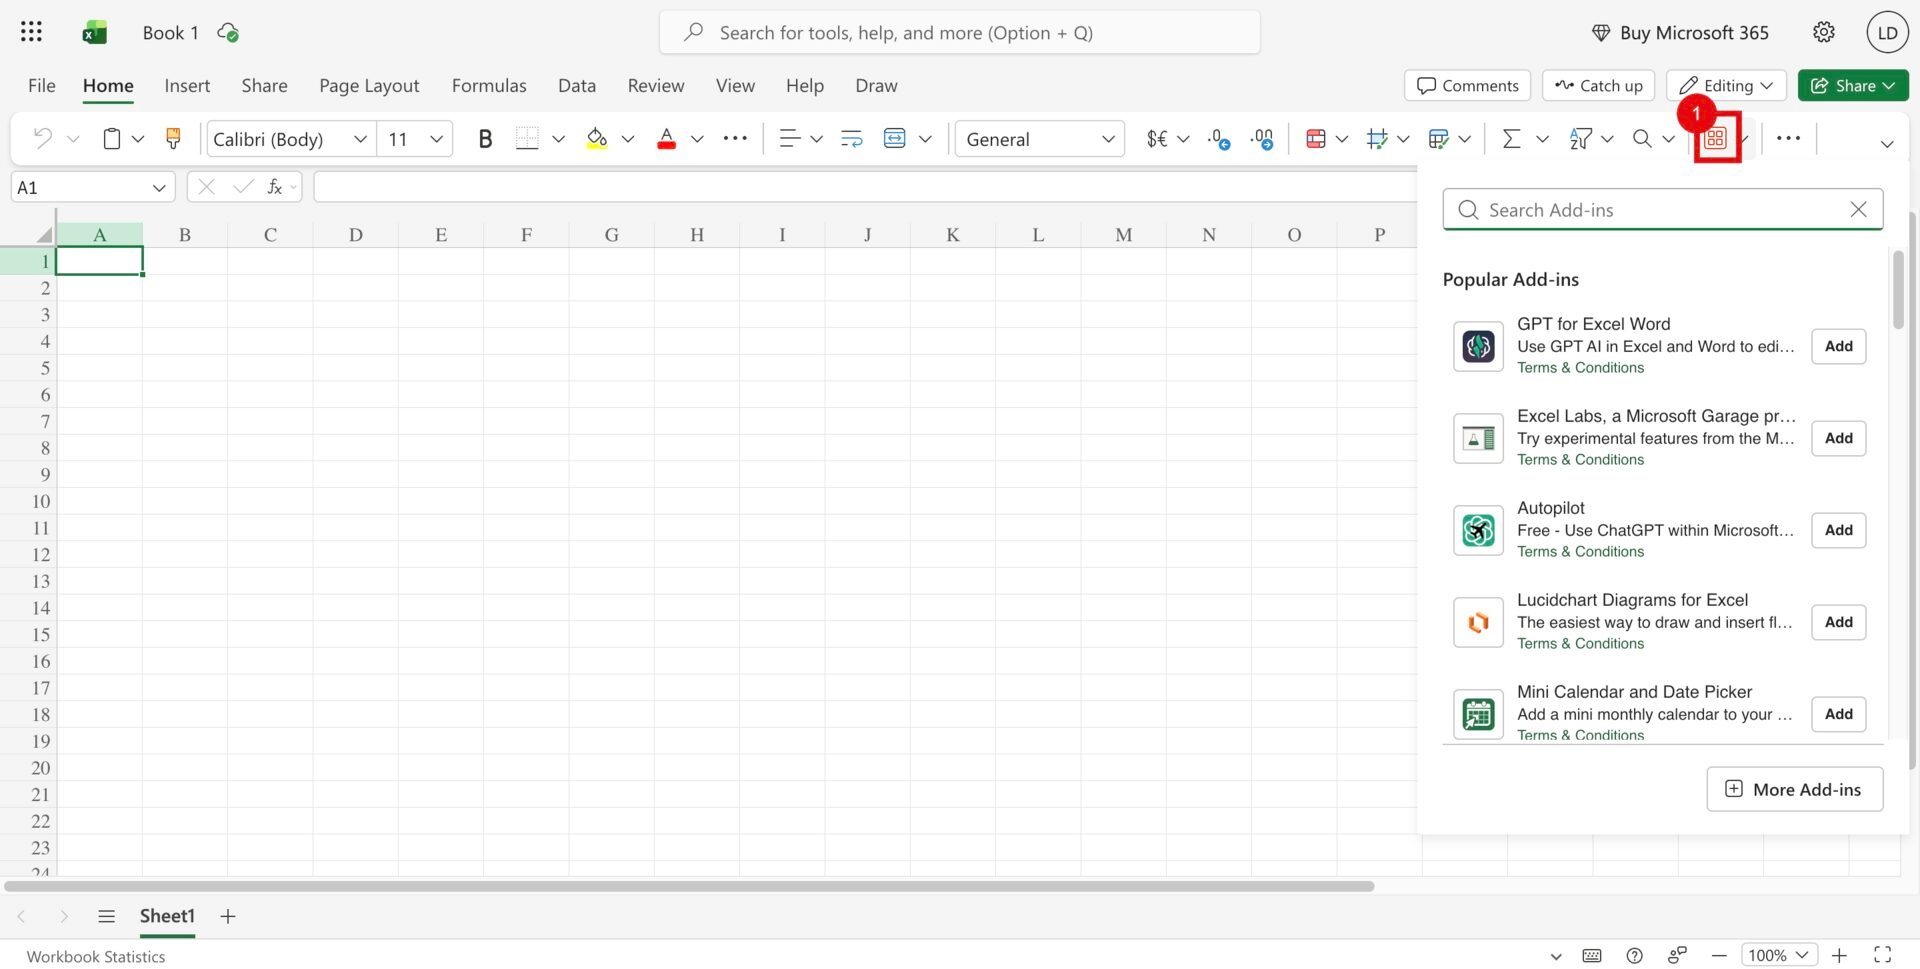
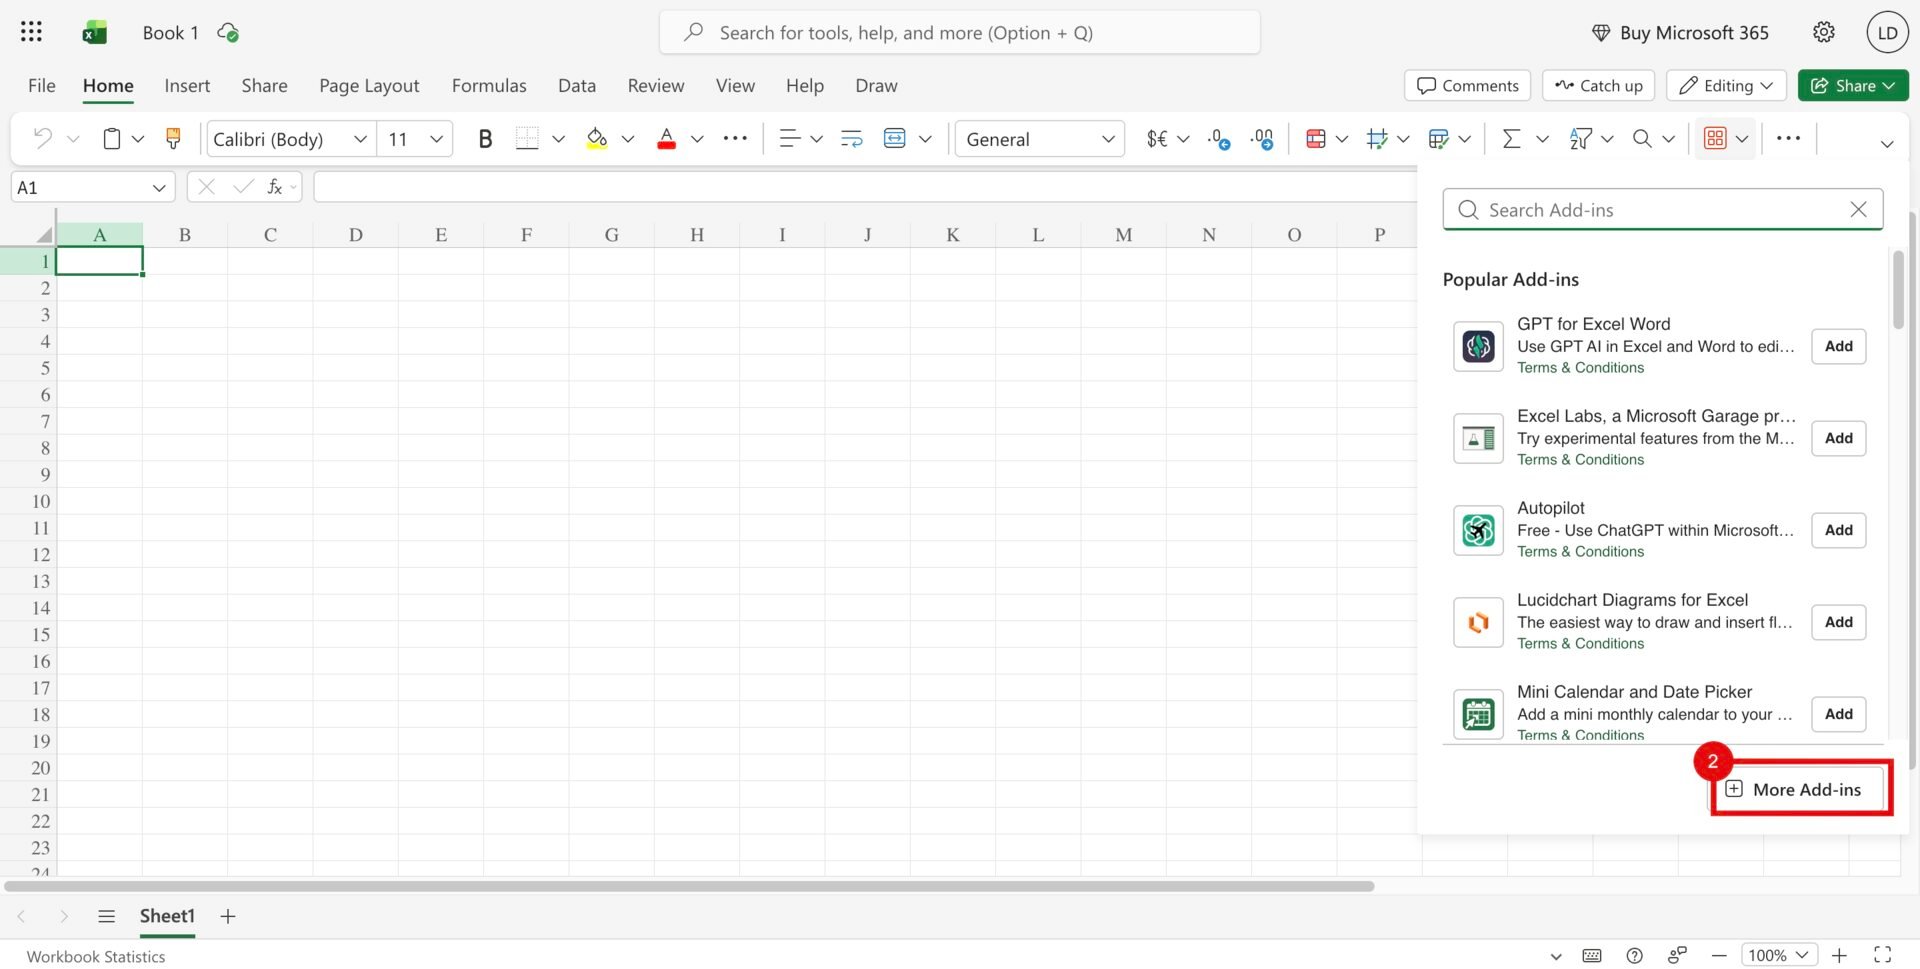
2
Upload the manifest
Open Manage My Add-ins and choose Upload My Add-in (3).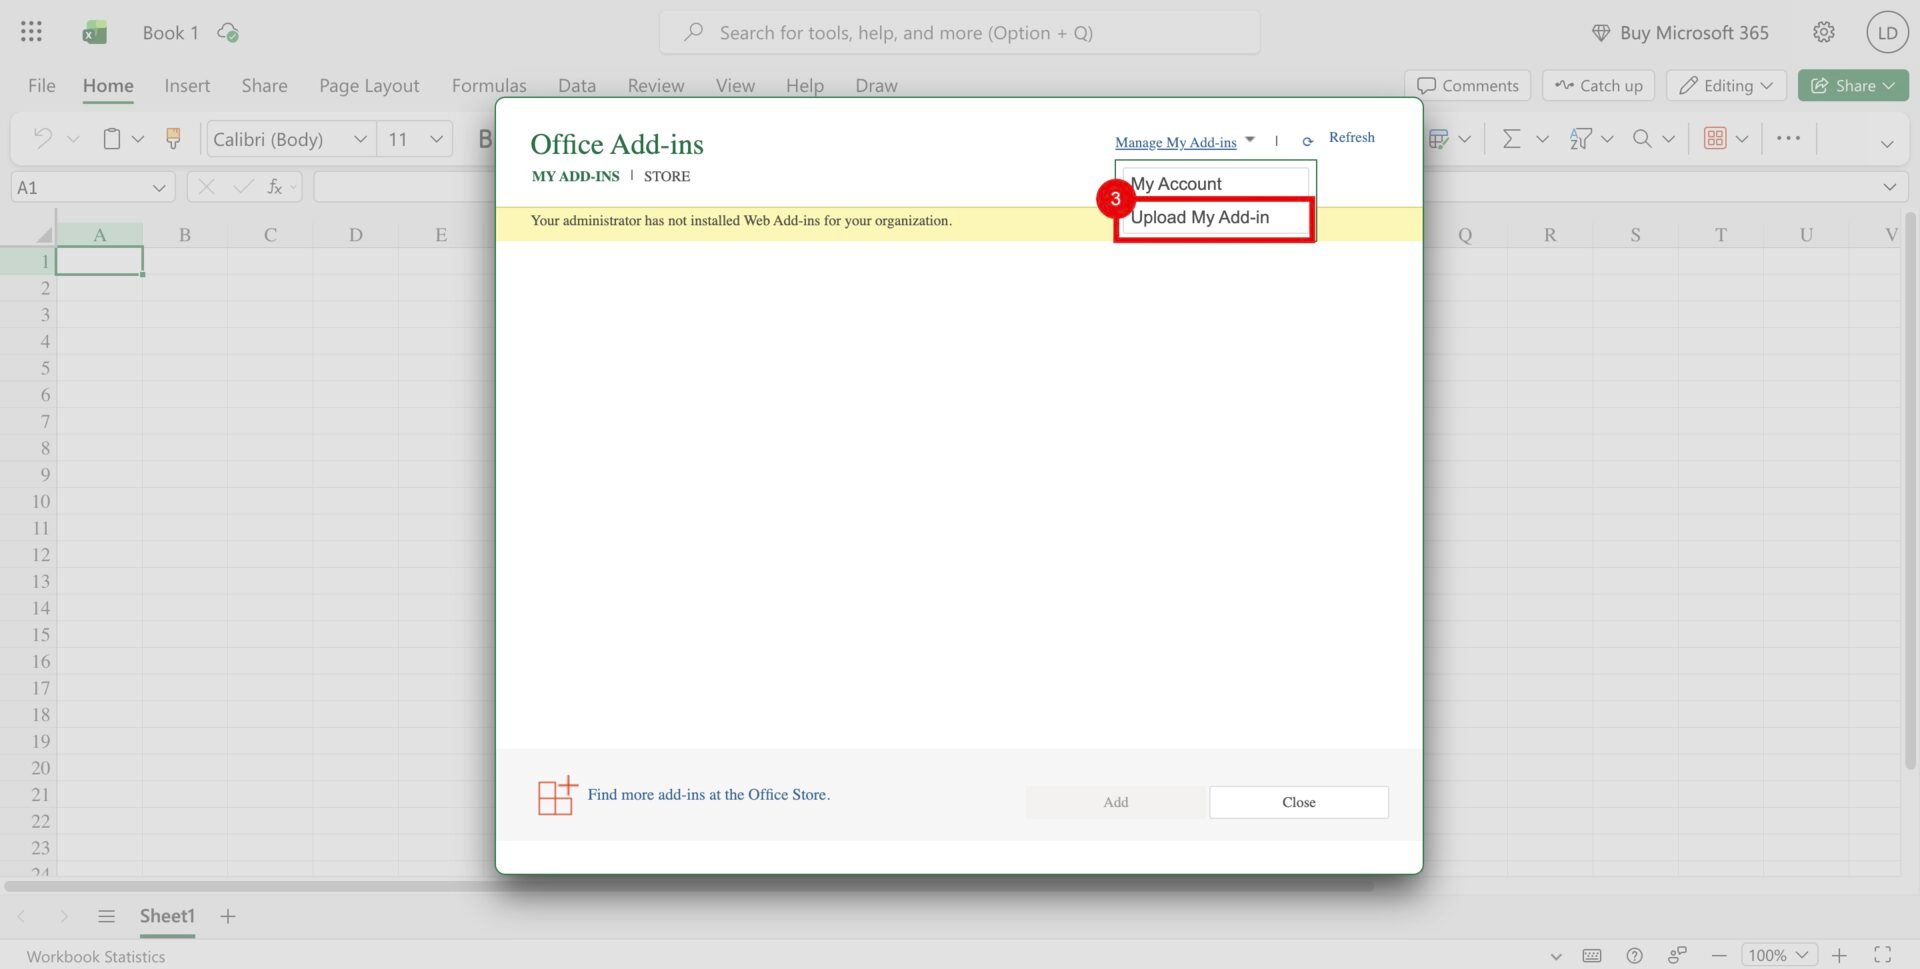
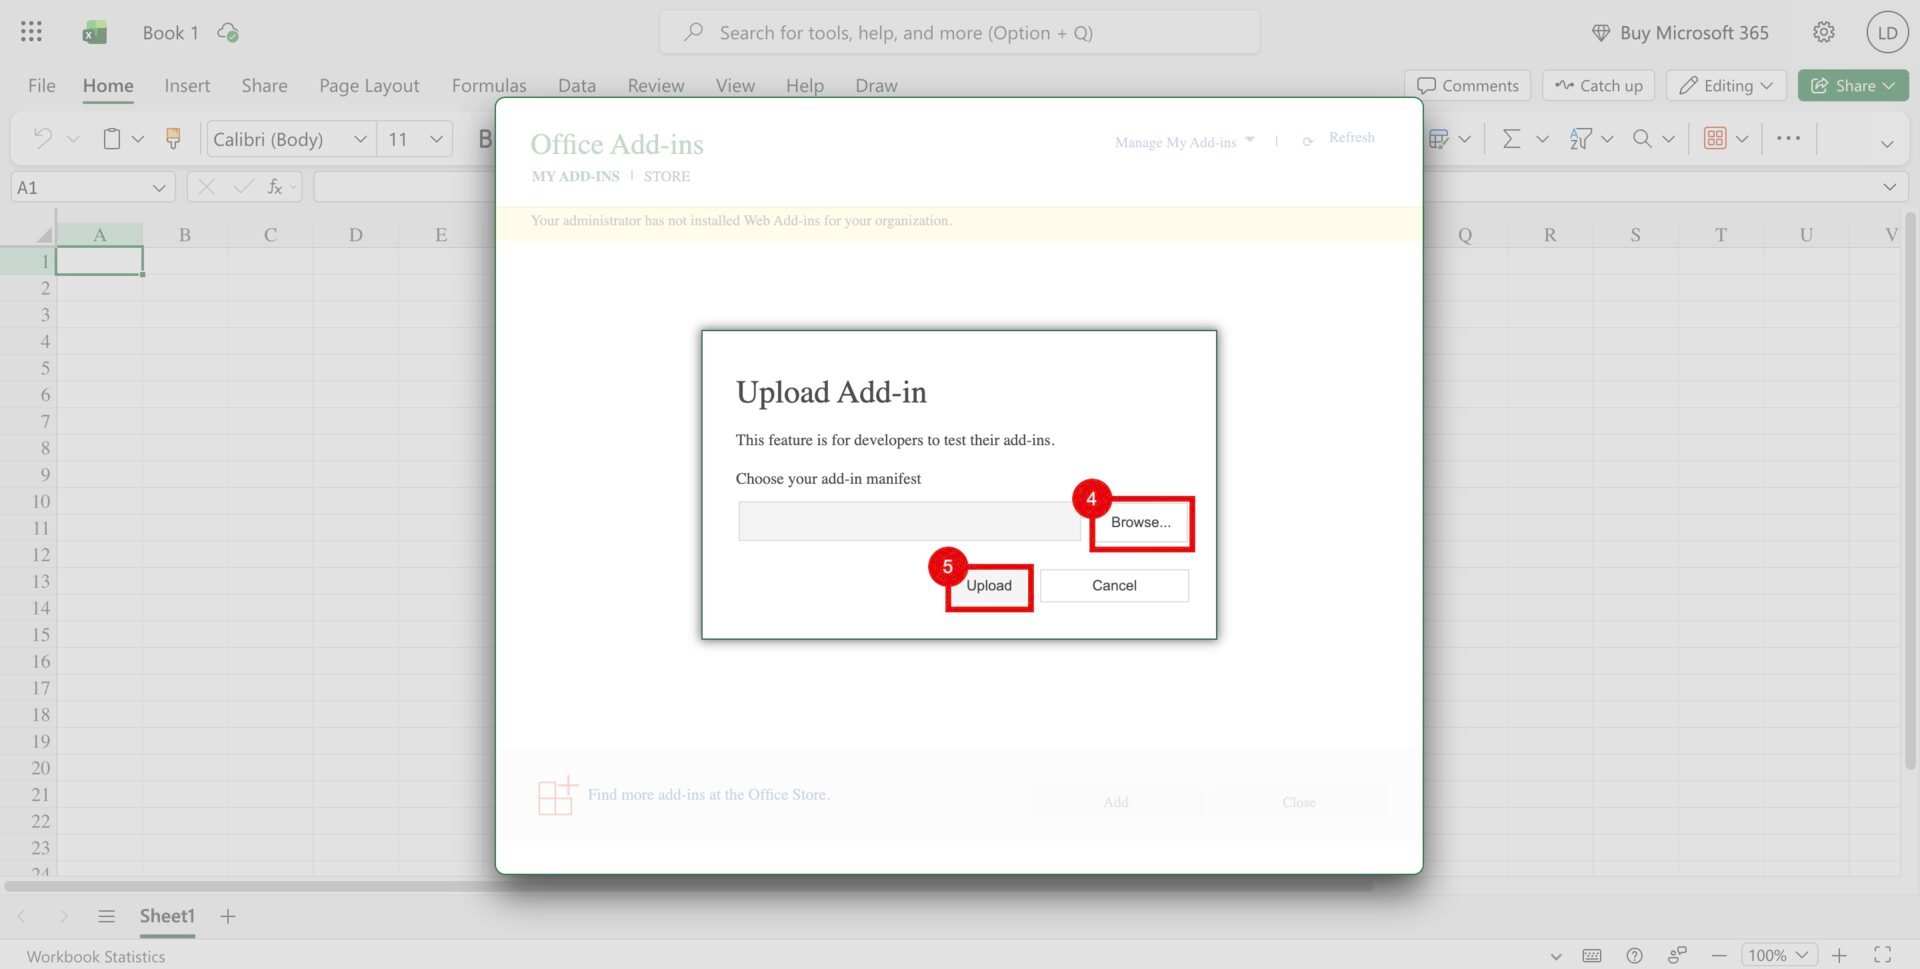
unsiloed-excel-addin/manifest.xml, and then
click Upload (5). The Upload button becomes available after you select
the file.3
Check the task pane
The Unsiloed Table Extractor pane should open on the right side of the
workbook (6).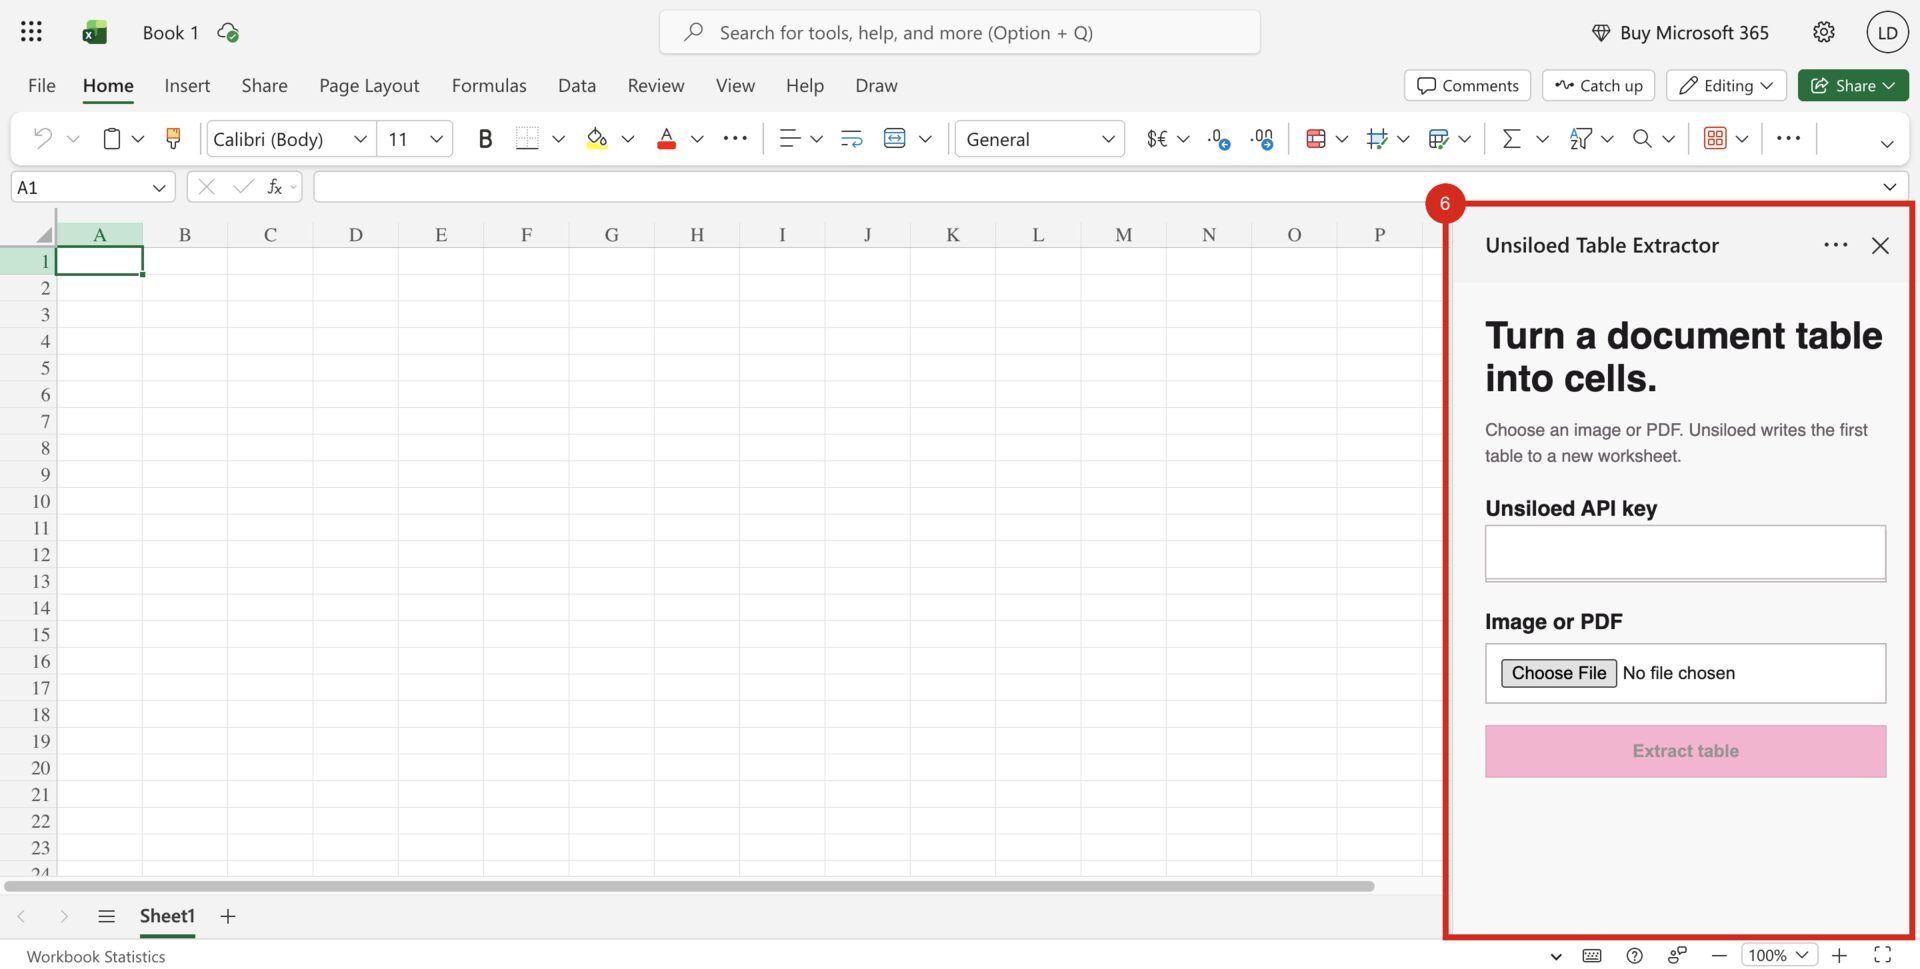
Step 7: Extract a Table
Use the task pane to process the sample document:- Enter your Unsiloed API key.
- Click Choose File and select the downloaded
sample-invoice.pdffile. - Click Extract table.
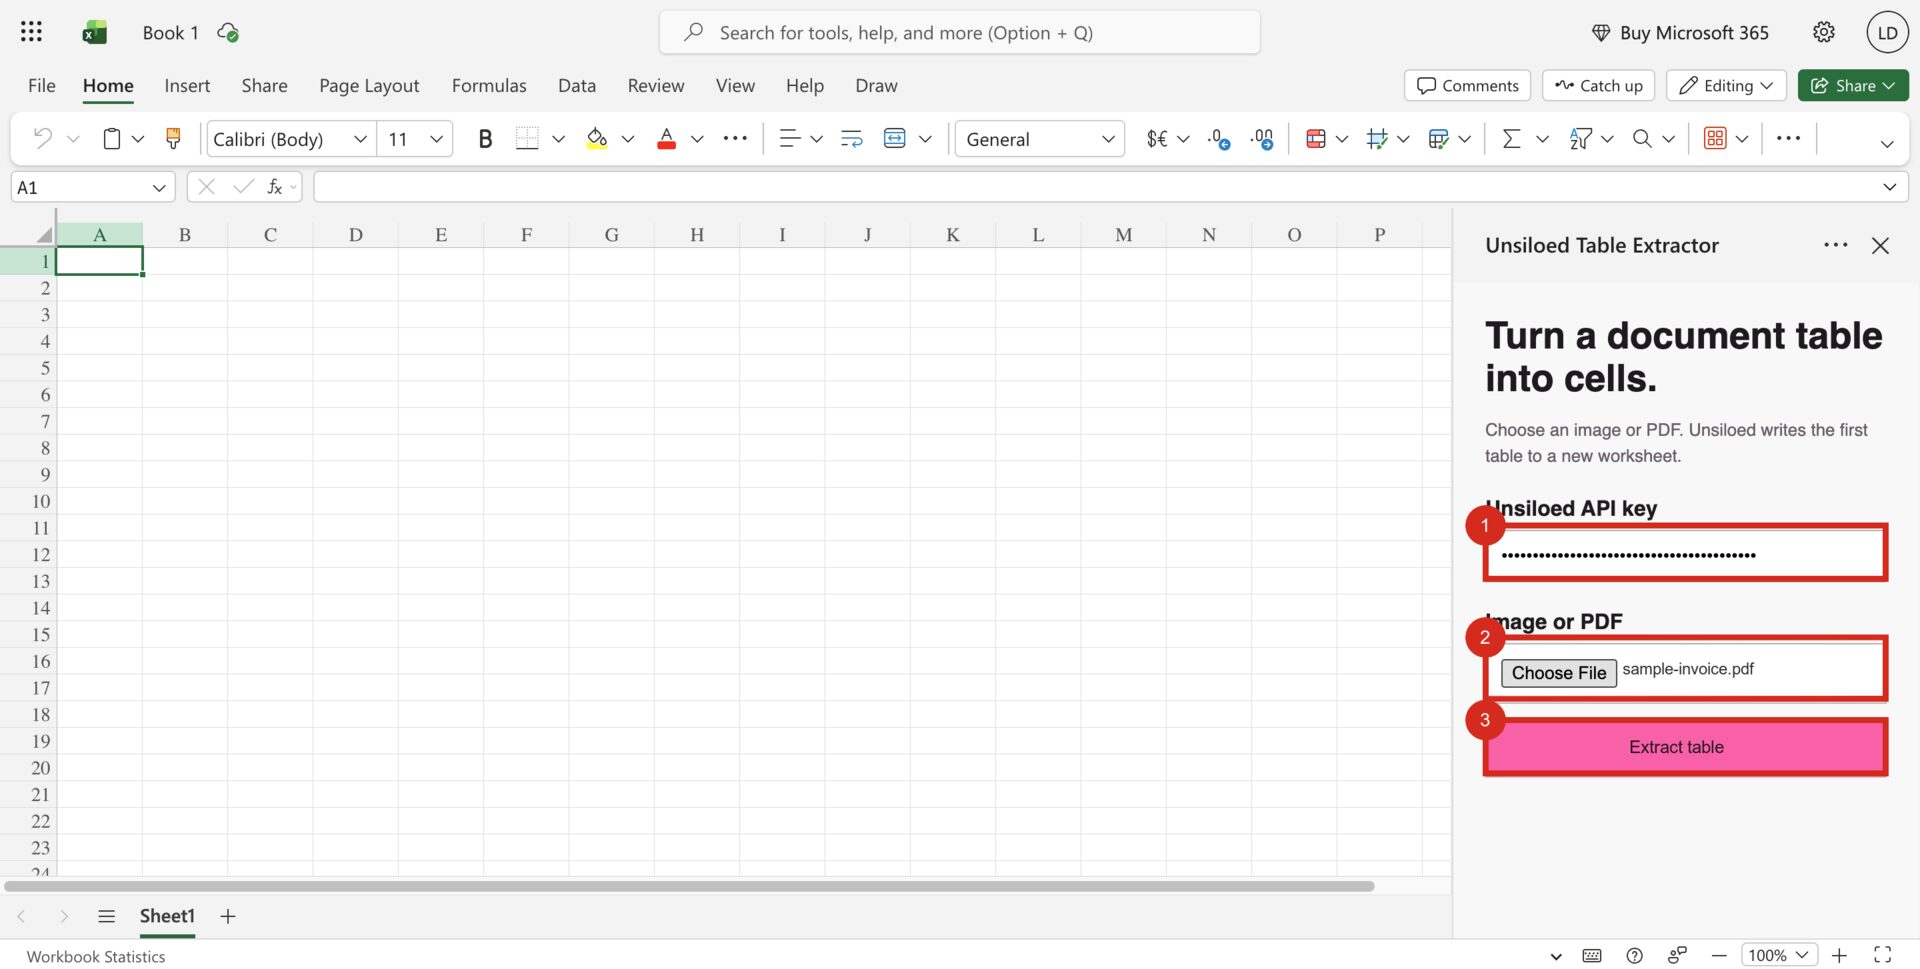
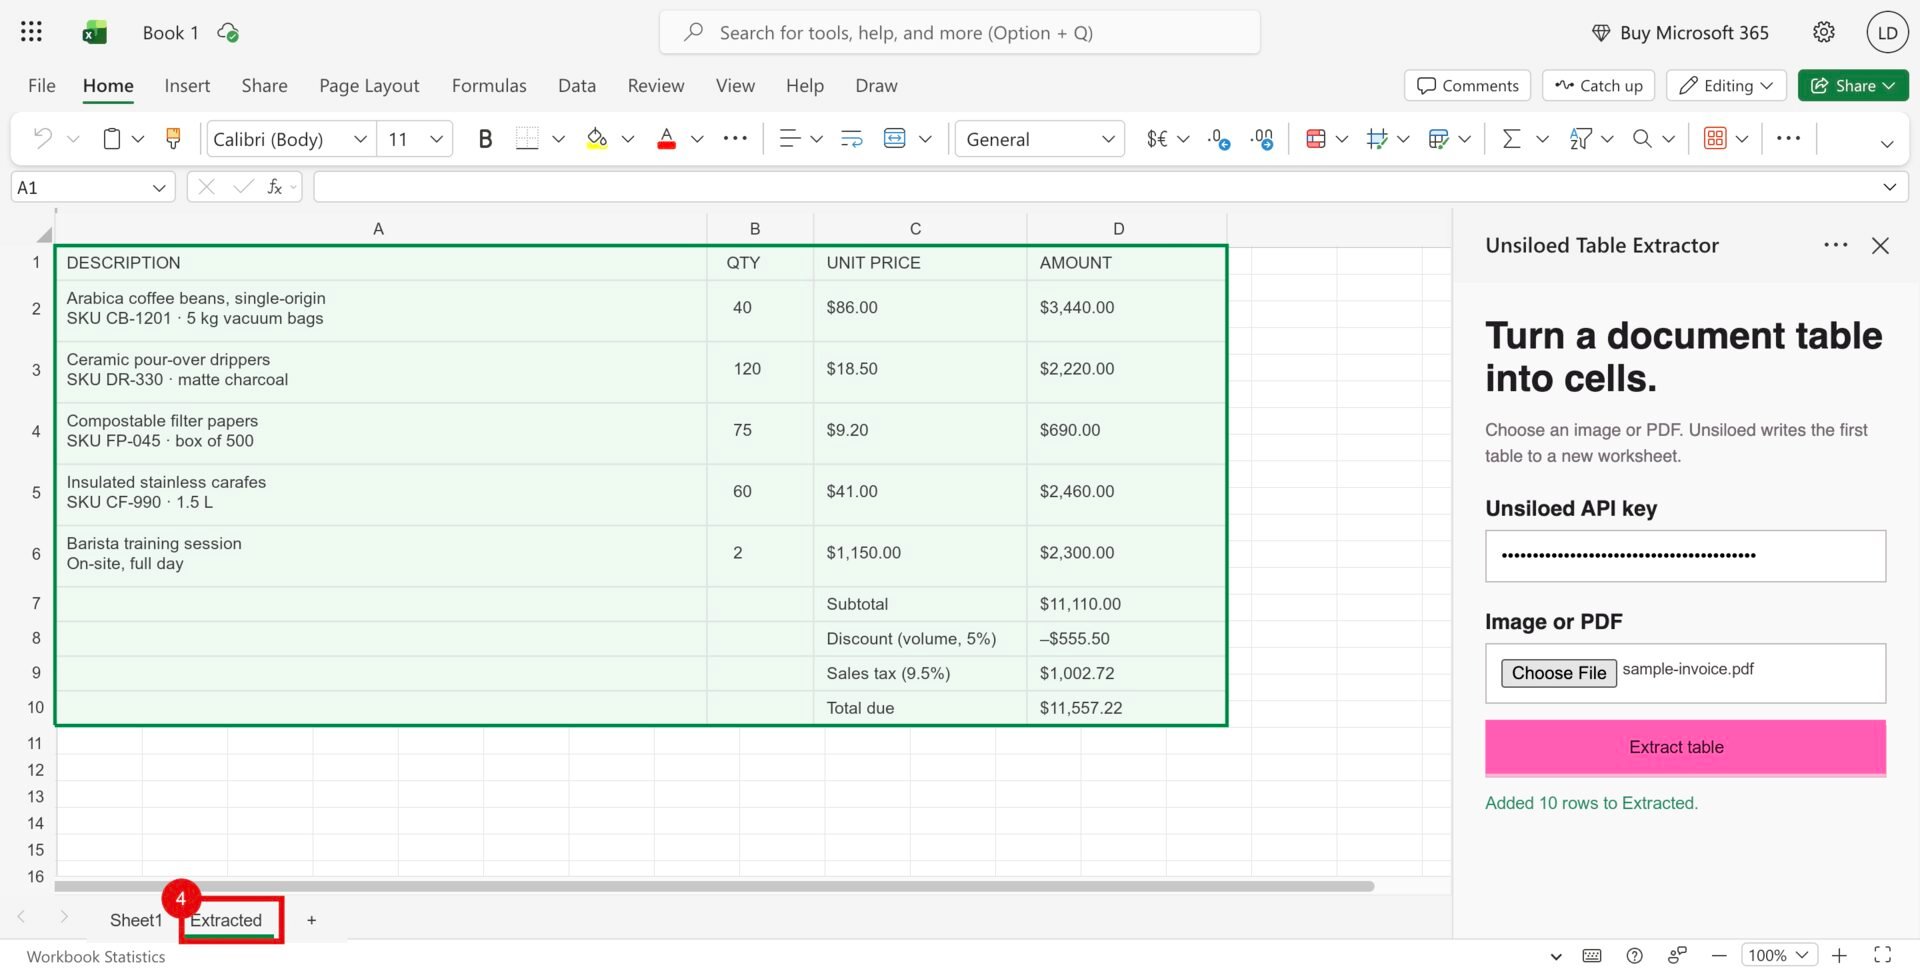
Extracted worksheet (4).
The sample produces 10 rows and four columns. The header row should contain
DESCRIPTION, QTY, UNIT PRICE, and AMOUNT; the final row should contain
Total due and $11,557.22. Running the add-in again creates Extracted 2,
preserving the earlier result.
The code formats the destination range as text before assigning values, which
preserves currency symbols, leading zeros, dates, percentages, and table
labels. Use schema-based extraction
when you need typed fields in fixed columns.
Troubleshoot the Add-in
Excel can't load the task pane
Excel can't load the task pane
Confirm that
npx vite is still running and that
https://localhost:3000/index.html opens in the same browser without a
certificate warning. In Chrome’s site settings for excel.cloud.microsoft,
set Local network access to Allow, reload the workbook, and upload
manifest.xml again.The Unsiloed add-in is missing
The Unsiloed add-in is missing
Open Home → Add-ins and select Unsiloed Table Extractor. If it isn’t
listed, use Upload My Add-in to load the manifest again.
Unsiloed did not find a table
Unsiloed did not find a table
Confirm that the table has visible rows or aligned columns, then try a
larger or sharper image. The recipe stops instead of writing ordinary text
segments when the parse result contains no
Table segment.The status line says Invalid API key
The status line says Invalid API key
Re-enter the Unsiloed API key. The add-in doesn’t save the key between task
pane sessions.
Limitations and Next Steps
This example has a few limitations:- It writes the first
Tablesegment. For documents with several tables, add a preview or selector before callingwriteRows. - It writes every cell as text. Use typed schema extraction when downstream formulas need numbers or dates.
- It processes one local file at a time and stops polling after five minutes.
- It keeps the API key in task-pane memory. That works for a personal local tool, but a distributed add-in should use per-user authentication or a backend that keeps shared credentials out of browser code.
Parsing
Review the asynchronous parse workflow and response structure.
Element Types
See the segment types returned by parsing, including
Table.